Saturday, January 9, 2010

A Super Cute Rosette Pillow From a Pair of Pants!

I made this pretty pillow for my sister as a housewarming gift for her new house. I was in camp when she had her housewarming party though so I wasn't able to give it to her until Christmas. It was a lot of fun to sew and kept me busy when I was staying with Aren while he was on a job in Grande Cache. It took me a while since I didn't take it to camp with me. Now that I have a portable machine though (thanks Pris!) I will be able to take stuff with me while I'm out. Awesome!

I started with these pants that my sister gave me while I was visiting her.

These were my two ideas for the rosette pillow. I decided to go with the rectangular pillow as the square one seemed too busy.

I made some piping (some people will call this cording) for around the edges to give it a sleeker look.

This is the finished piping before it was sewn onto the cushion itself.

One side of the cushion with the piping sewn down. You can see the seam at the bottom wear the edges of the piping meet. This will be enclosed in the pillow seam once it is all sewn up.

I used an existing pattern that I had made for the rosettes. Basically three circles of varying size.

Each rosette consists of six pieces. You sew two of each size together, cut a small hole in the middle and turn it inside out, then iron them flat. Sorry some of these photos are no good. I don't know what setting the camera was on and I can't really go back and take new photos now. :)

Then you gather each of the pieces into a rosette shape.

After the center piece has been gathered you gather the next piece around that one being sure to hide the hole you cut in between each layer. From left to right we have single rosette centers (three), then a center sewn to a 2nd piece and finally a finished rosette.

The two sides of the pillow were sewn together and it was stuffed before the rosettes were sewn on. Using very small stitches s as to keep them completely invisible the rosettes were sewn down securely in a line across the front.

The Finished Cushion
As I said, this was a fun project and my sister really likes it which makes it well worth the effort! I am pretty excited about the machine I got for Christmas too as I have been unable to do much as far as crafting goes while I am out in camp. I am thinking that I will finish my Strip Quilt while I am out there.

Wednesday, January 6, 2010

Nifty New Pincushion / My Strip Quilt!

I got a new book from the library the other day and was pleasantly surprised by some of the projects inside. The book is called "Elegant Linens - 26 Projects for Creating Your Own Luxurious Linens" by Chippy Irvine. This project really struck me as cute (pretty easy too) and I decided to have a whirl at it.


Basically you cut out a shape twice in cardboard, set it on a flannel and trace it out, then on a fabric and trace that out. One layer at a time you secure the fabric/flannel to the cardboard. Once you have both cardboard pieces covered in flannel and fabric you sandwich them together and use tiny overcast stitches to secure it together.


Being the recycler that I am I used cardboard from a beverage 24 pack! Haha.


I didn't take any pictures mid construction (I don't know why..) but this is my finished pincushion! Cute, functional and ready for use. These would have been a great stocking stuffer for my family members who sew. Next year I guess!

Now don't everyone go and start thinking that I forgot about the quilt I started. I am still working on it (I have never made  full size before and gee it takes a long time!).

Here I have strips to be sewn together.


And MORE strips to sewn together.


And EVEN MORE strips to be sewn together. Slow going but I am well on my way! There are realy only 52 strips of strips so it's not THAT bad..... Either way it will be done by the time it is picnic season.

Tuesday, January 5, 2010

Strip Quilt Beginnings

So as I posted this morning, I am making a strip quilt to use up some of my stash. Well now that I have one whole side cut out I still have just as much fabric! I don't think this even put a small dent in what I have stashed away. Oh well. So I am planning on doing a reversible quilt with one side squares and one side strips. Here you can see the strip side all cut out.


So I used red and blue (obviously) for this side of the quilt. Unsure as to what I will want to use on the other side. We'll see once I get this one sewn together. Until next time!

Monday, January 4, 2010

The CraZY String Quilt Project!

    So I have a LOT of fabric in my stash. I mean A LOT. I get fabric from thrift stores, family members, old clothes, the Reuse Centre, stores, everywhere basically. So I have been thinking for a while that I really wanted to make a quilt for use when we go out for picnics. When I was a child we had this heavy old quilt that had been made by my dad's mum. It was four layers of fabric scraps (no batting) pieced together and then tied with yarn. Most (if not all) of the fabric was from old clothes or other worn out items. We used it for everything: picnincs, playing in the sand, sleeping with, etc. By no means was it a perfect quilt but I think that is what gave it so much character. Well today I was online checking out some different string quilt pictures and I was getting frustrated with what I was seeing UNTIL I found this post on Lazy Gal Quilting.


This picture appears on her blog and is an example of a string quilt made during the depression era. It really reminded me a lot of the quilt my grandma made. No set pattern, no typical "quilt" look. I had been planning on making a quilt with my fabric but felt that I didn't want it to look like a typical "country quilt". Well this particular post really gave me the inspiration I needed to begin this project and I am super excited about it! Check out the post if you want, perhaps you will be inspired as well!
Stay tuned for pictures of my own quilt once it is underway!!!

Christmas Presents!!!

Well now that Christmas is over I can actually post all of the pictures I took of the gifts I made for everyone. Hurray!

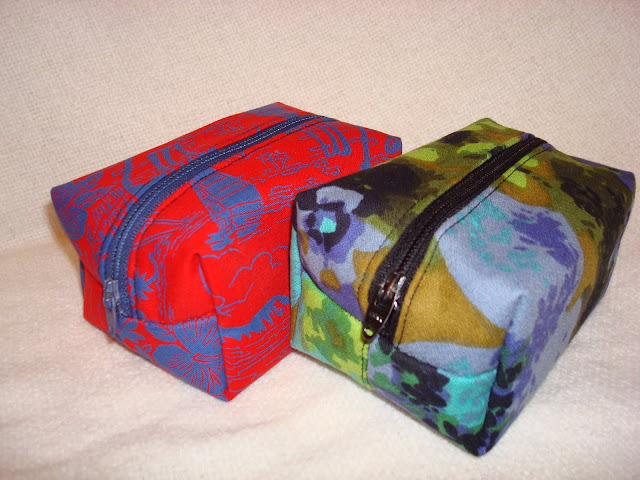
So for starters here are these really cute square box/bags that I made for my sister and my mother.

The one for my mum has two leather leaves sewn onto one side. The zipper is orange to coordinate with the lining of the tote I made her. All of the fabric, leather and even the zippers came from my stash.


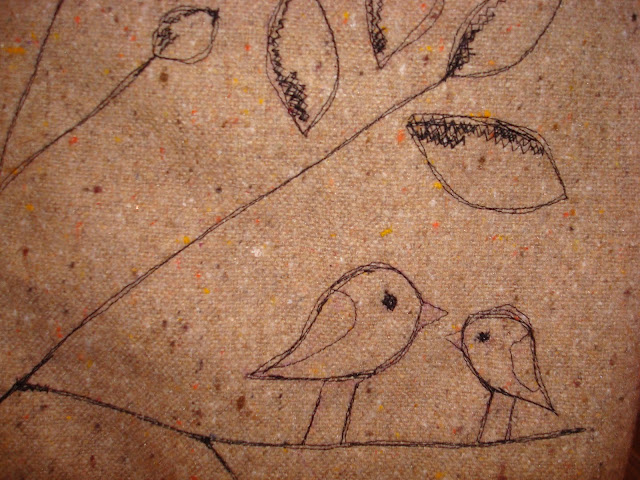
This is the tote I made for my mum. Thread sketching is one of my new favourite things! It isso much fun to do and it is surprisingly easy too. I drew on the fabric first with a disappearing fabric marker and then stitched over the design. Sooo much fun.

The inside is a gorgeous shade of orange. I didn't put any pockets on the inside, I don't know if I had a reason for this... I think I just didn't want any pockets. It looks sleek and smooth and very shiny.


A close up on the little birds. These were so fun to sew. Honestly thread sketching opens up a whole new world of possibilities. I had done this before with random zig zagging or random lines but wow, an actual picture and it turned out so cool too. Can you tell I'm proud of this one?

My sister gave me these crazy pants a while back to be refashioned into somethin new. I hope she will be pleasantly surprised with the drawstring bags I made for her stocking!


This was SUPER easy since the drawstrings were already in the pants. I chopped off the legs, serged and voila! Two new drawstring bags. A great stocking stuffer.
Unfortunately I am unable to post ALL of the Christmas present pictures as my husband went to work today and took the memory card with all my pictures by accident. Hopefully he will be back before I have to go back to work!